This article assumes you are configuring ProsperOps access for a Savings Analysis using the ProsperOps Console onboarding flow. For more general information, see overview for setting up Azure IAM permissions.
Add Azure Billing Scope
- Navigate to your Azure Portal
- Fill out information from your Azure Portal to Complete this Onboarding. Help article detailing finding this information in your Azure Portal.
- Service Principal Application (client) ID
- Service Principal Directory (tenant) ID
- Agreement Type
- Billing Account ID
- Billing Profile ID (MCA Agreement Type Only)
- Billing Export Subscription ID
-
Return to the ProsperOps Console and click Add Azure Billing Scope
-
Enter Information gathered from your Azure Portal
- Click the Next button to proceed to the configuration steps. Each step of the configuration process can be executed by different users as long as they have appropriate administrative privileges.
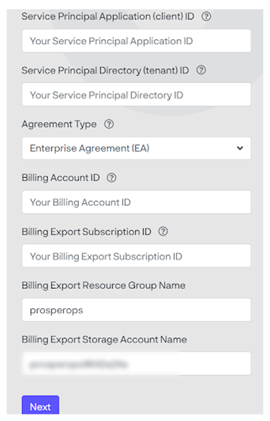
Note: You may change the Resource Group Name and Billing Export Storage Account Name to follow your naming convention. These do not need to exist in your Azure Portal. They will be created later in the onboarding process.
Multi Tenant Note: If your billing scope has multiple tenants, you will need to create the ProsperOps service principal in the tenant that has the most spend. The service principle will need to be configured on each additional tenant to allow the service principal to view the hourly volatility and estimate coverage for the subscriptions in the tenant. After the initial configuration is complete, the ProsperOps console will provide instructions to configure the additional tenants.
Add the ProsperOps Certificate to the ProsperOps Application in Your Azure Portal
- Download the ProsperOps certificate from the ProsperOps Console
- Open Certificates & secrets in the Azure portal
- Click Upload certificate, then upload the ProsperOps certificate
- Click the Validate Button in the ProsperOps Console to proceed to the next step

Grant Billing Scope
Access level required: Enterprise Administrator or Billing Account Owner
-
For EA Agreement
-
A script will be generated to be run from your Azure Shell.
-
Run the script in bash. (There is no way to do this in the portal. The script is giving the ProsperOps service principal the right to read the billing account so ProsperOps can ingest the cost and usage data.)
-
- For MCA Agreement
- Go to Azure Portal
- Change the scope to be in the Billing Profile that corresponds to the ID provided in the initial step on the ProsperOps Console
- Click Access control on the left blade, then click Add
- Select Billing Profile Reader role
- Add the ProsperOps service principal, then click Add

Grant Root Management Billing Access
Access level required: Owner of the root management group
- Open Management groups in the Azure Portal
- Select the root management group (default name: Tenant Root Group)
- If the tenant root group is not a clickable link, elevated privileges may be required within Entra ID -> Manage -> Properties and toggle yes (learn more here)
- Select Access control (IAM) on the left blade, then click Add -> Add role assignment
- Select the Reader role, then click Next
- Add the ProsperOps service principal as a member
- Click Review + assign

Create & Grant Storage Account Access
Access level required: Enterprise Administrator or Billing Account Owner
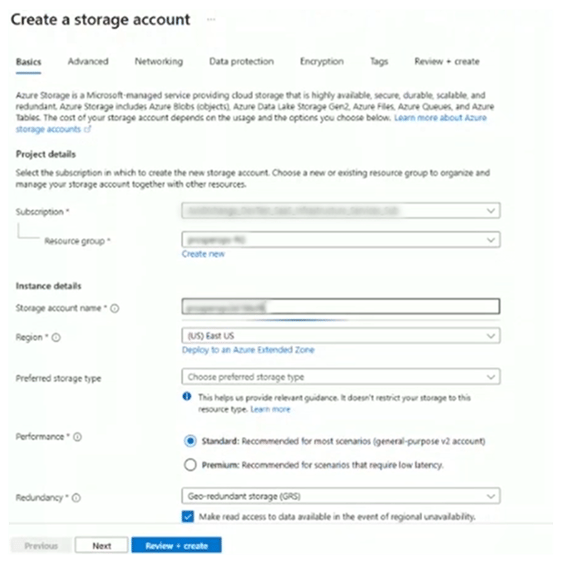
- Create a storage account in the Azure Portal
- Select the Subscription that was entered in the initial step on the ProsperOps Console
- Create a Resource group with the name entered in the initial step on the ProsperOps Console
- Enter the name of the Storage account entered in the initial step on the ProsperOps Console
- Click Review + create, then Create
- Open Access Control (IAM) in the Azure portal, then click Add -> Add role assignment
- Click Privileged administrator roles, select the Owner role, then click Next
- In order to create and configure cost exports, Microsoft requires the Owner role, without conditions, on the storage account. We do not support custom roles, and we will not be able to successfully complete onboarding of your billing account until we have it.
- Supporting documentation from Microsoft
- Select Allow user to assign all roles, then click Next
- Click Review + assign

Register Cost Management Exports Resource Provider
- Open Resource providers in the Azure portal in subscriptions
- Select Microsoft.BillingBenefits and Microsoft.CostManagementExports from the list of providers
- Click Register
